The Making of Art War 4 3D Finalist: Warrior of Desert Sands
José Antonio Tijerín is starting his career in illustration. He is currently making "Visual Novel" style video games mixing 2D and 3D art in which he makes use of his experience making webcomics. Here he takes us through his step-by-step process of "Warrior of the Desert Sands".
This is my first time entering the Cubebrush's Art War contest and it has been an experience from which I have learned a lot. Here I leave the process by which I created "Warrior of the Desert Sands" and the things I learned in the process.
The Idea
From the beginning, I thought that I had to make a difference from the rest of the works that were going to be submitted to the competition, so the first thing I did was to research the works that were being submitted to the competition and the ones that had been submitted in previous works.
I decided then that I would present a concept art of a person with an anatomy associated to that of a woman who shares features mainly with the "Tuareg" ethnic group that could handle the power of the earth (which in my opinion was the element that could have more play given the amount of variety of concepts associated to the word).

These images do not belong to me, they have only been used for reference purposes.
For her clothes, I decided not to hyper-sexualize the character and to give her a suitable clothing for her warrior role. I took many references that could remind me of a medieval Arab warrior (you'll see that there are references to pencil and watercolor illustrations because I wanted to do a texture work that simulates watercolor).

These images do not belong to me, they have only been used for reference purposes.
The Sketch
I made several sketches of the face playing with several sketches (many were just notes on a napkin) but I decided on the design of the turban because it would give me more play in terms of the textures of the fabric. I started with the face because I knew it would completely define the design as it would also be the focal point of the design.


For me, it is very important to define the pose and general dress at first thinking about the final position of the camera forgetting at first the details and complements to focus on the base to be as solid as possible.
The Base of the Model
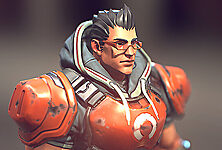
To differentiate myself from the rest, it was important to move away from the canons of physical beauty that are usually seen. To do this, I took references from young women who worked in the fields regularly and began to create the character's body in Zbrush. Here, you can see the character even without the retopology and the first 3d sketch of the turban.


I usually work better with few polygons and as soon as I have a clear idea of the general shape of the objects I take them to 3D Maya to do the retopology (unless it's very simple, in which case I do it in Zbrush). So I made the helmet (that finally you can hardly see) which I brought back to Zbrush to use the function it has to create multiple symmetries.
On the other hand you can see how I usually correct my models in 3d by making a capture and taking them to clip studio where I draw over them to have more clarity as I had drawn.
Clothing and Retopology


Once I had the retopology of the turban and I had the base of the clothes I decided to start playing to put details to the model making some sketches above to see the possible details that I could include in the model.

Rigging and Modeling
For the retopology of the body, I used a model that I had already done for an exercise in which I took as a reference the predefined model of Daz to learn how to do a correct retopology, it was very useful especially to see how to do the retopology in very specific areas such as elbows, ears and above all I did it to look at the nails. For this work I finally eliminated all the parts of the body that were not seen to save but the model.

Finally I made a fast rig in 3D Maya and did the pose following my sketches. Later I corrected the anatomical errors in Zbrush.

Weapons
I was very clear about the weapons, so I didn't do many sketches. All the models that are rigid objects I make them in 3D Maya and the texture I did it in Substance Painter except the embedded gems that I brought in the form of UV map from Zbrush and the calligraphies that being very precise traces I had to go to Clip Studio to be able to make them.

The color gradient on the right side belongs to a more advanced stage of development, but I wanted to illustrate the idea I had at that time about the character's general colors.
Textures
I don't usually do this step until the model is completely finished, but this time I did it while still creating elements of the character's clothes. This was very necessary, especially for the mesh size that the character wears, because without seeing the texture of the Maya size, I couldn't include the elements that would be attached to it.
First, it can be seen as to the coat of mail in Zbrush in such a way that it could be used as a color and volume pattern in Substance Painter. Once the texture was right, I removed the elements that were cut by the texture to give a true mesh feel.

And once the opacity mask was finished I was able to take it to Zbrush to continue adding elements to the mesh. I created these elements entirely in Mayan 3D; first making them round and very detailed and then placing the simplified geometry on top to save weight on the character. Later on in Zbrush I would create a UV layer and combine it all in Substance painter (with the exception of the mandalas they carry that were made in Clip Studio)

In the same way I made the rocks that would shoot out of the ground. Here you can clearly see the technique I used in general to all the textures: in Substance Painter there are intelligent textures capable of understanding the shapes of geometry and creating more realistic textures that by adding the filter that gives light and shadow to the textures results in a lot of realism to the textures.

Here you can see the rocks without texture and the low retopology already arranged in Sketchfab.

Finally I started to explore the possible textures of the body and the fabrics, here you can see an exploration of the textures applied to the face.

There are many details of the textures that I will not be able to tell like removing the opacity of the final part of the rocks to give them a sense of movement. But there is something that can't be left out, to do the calligraphies of the cap I used the Clip Studio: Pattern. tool to make a custom layout that I could repeat many times and save myself millions of strokes. Finally the silver effect was removed.

Final Details
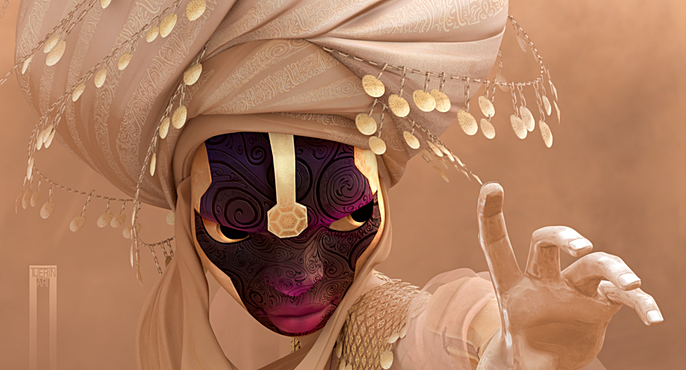
This step (especially on the face) was the longest by far. The texture tones had to be adjusted up to 5 times or more in some cases, among other things because it was the first time I used Sketchfab. Here's a comparison between the 3d with real time rendering the last image and another one with only the textures without light (the first one) so you can see the difference.


The 3d model you can see in Sketchfab to examine details such as the metal chest shield, the magic rock, the belts, the floor and many other things that I'd like to explain but are not as important and would fill several more sheets of text and images (not to mention everything I learned about the effects and operation of Sketchfab and how it creates music).
https://sketchfab.com/3d-model...
Final Render
I used the Vray render inside 3D Maya to render the final work although my first intention was to do it all for Sketchup. To give some final details very necessary as the motion blur to the rocks I put the render in photoshop to finish the work.

The comments from the forum have contributed and seeing the work of the rest was very helpful and gave me a lot of experience. I hope I can compete again.
Get in touch with José here.