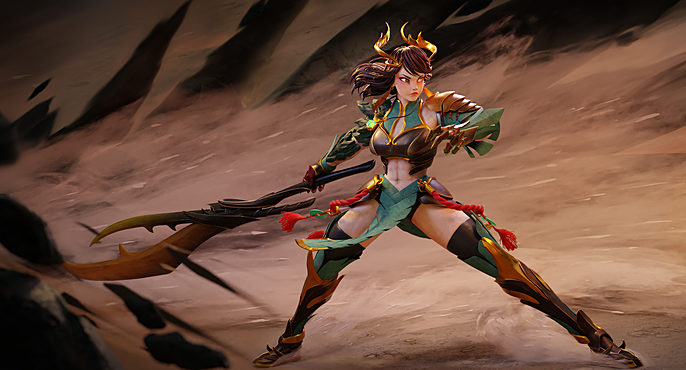
The Making of Art War 4 3d Finalist: Crystal Guardian: Jade
Jason Chan is a self-taught 3D character artist. After graduating with a bachelor’s degree in Graphic design in 2019, he completed a course in “Stylized Characters in 3D” at CGMA. Jason was fortunate enough to win the Art War 3 challenge with his 3D character, “Kira”. Currently, He is looking for working opportunities while doing personal projects on the side.
Here, he gives a breakdown of how he made his Art War 4 entry "Crystal Guardian Jade".
I have entered Art War once again this year as I had promised in my Art War 3 interview. Entering contests like these boosts my artistic abilities, introduced me to some amazing artists and also increases my online exposure. And top of that, awesome prizes can be rewarded to you if you become a finalist. My workflow has changed drastically after learning how to use Zbrush, knowing how to sculpt instead of box modeling gave me more time to focus on the design aspect, rather than worrying about the topology of the model.
Concept
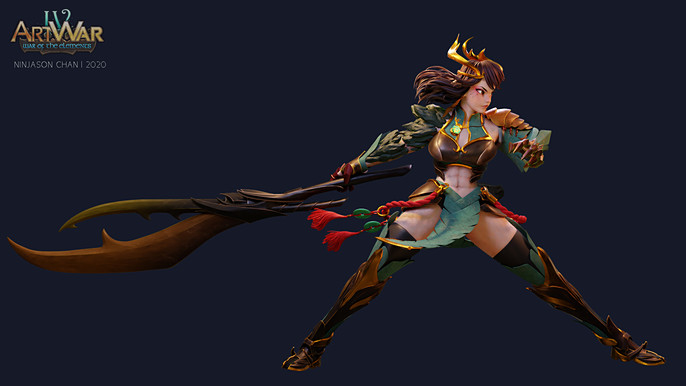
Coming up with a good concept is probably the toughest part of the entire contest. It is the deciding factor in whether your work will make or break. Translating 2D to 3D is already a challenge to most artists, the addition to come up with new ideas makes it even more challenging. Deciding on the character’s background early on (i.e. culture, time period, gender) really helped narrow down my options. For this contest, I have decided to create a Chinese fantasy warrior, because I love how its fashion is so distinguishable and elegant.
As for the topic of the contest, I chose “Earth” for several personal reasons:
• My favorite color is green
• I always wanted to sculpt rocks
• I think fire is an overused power
• I tried to avoid simulating/sculpting water, it takes too long to create
• I already did lighting last year, so I wanted to try something new
Process
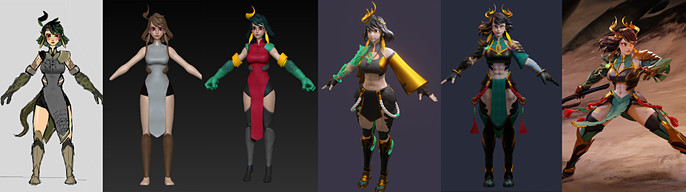
There was quite a bit of back and forth going on between Blender and Zbrush throughout my process. I sculpted the body in Zbrush using a sphere and then box modeled the outfit in Blender because I still find box modeling to be a fast method for creating cleaner results. I posed the character using rigs inside Blender and brought it back into Zbrush for anatomy amendments. After that, the body is then retooled inside Blender, UV unwrapped and sent to substance painter for texturing. And then it finally returns back to Blender for rendering and animation.
Clothing Design
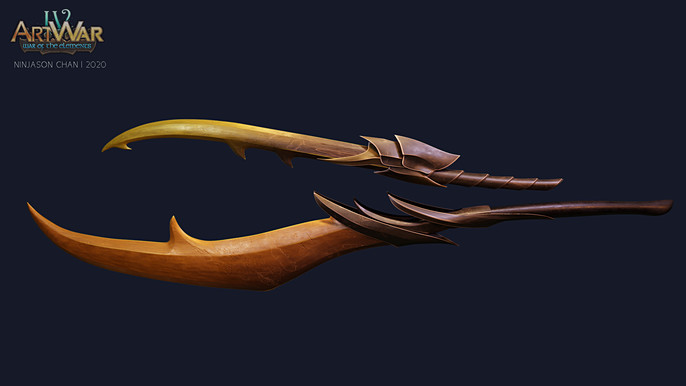
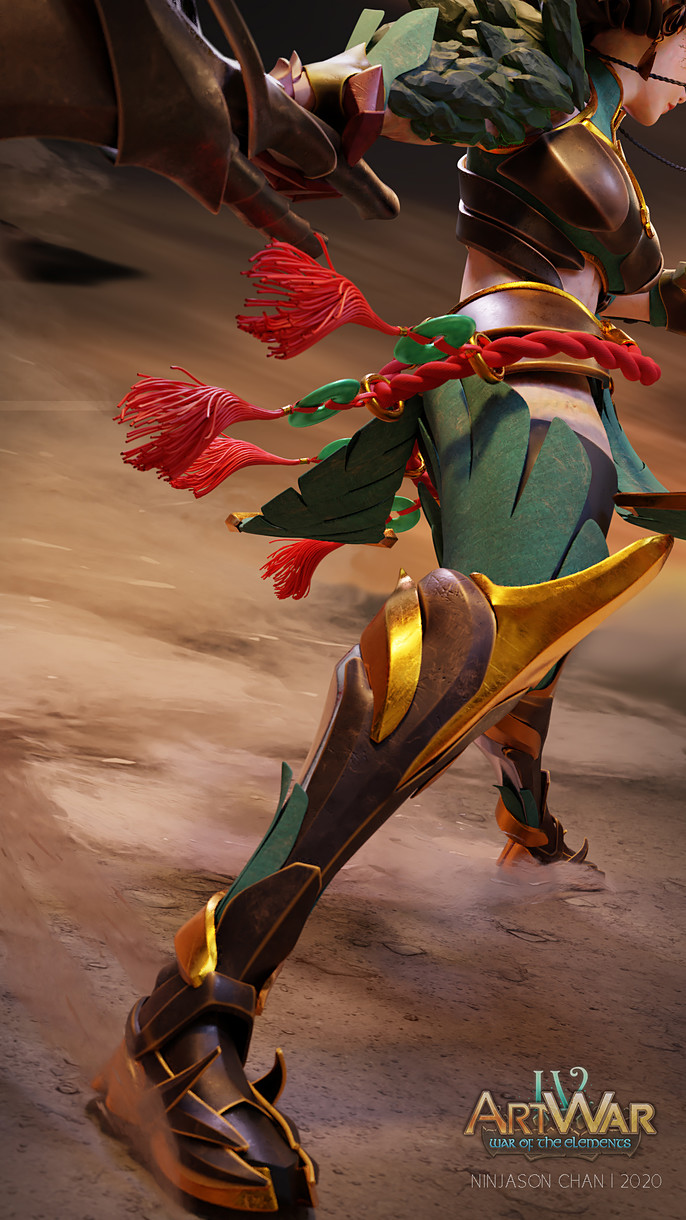
The outfit changed as the concept is shifted by the story. After some intense research and hopes to step out of the norm, I progressed from designing a typical red Chinese dress into something peculiar but still relative to the theme. The horn beetle came to mind as a friend of mine mentioned something about insects because of her crown.
All beetles come from the ground and have strong armor and physical strength, which matched perfectly well with what I was going for. I’ve found pictures of horned beetle jewelry on Pinterest, which really inspired me and helped me start the design of the armor.
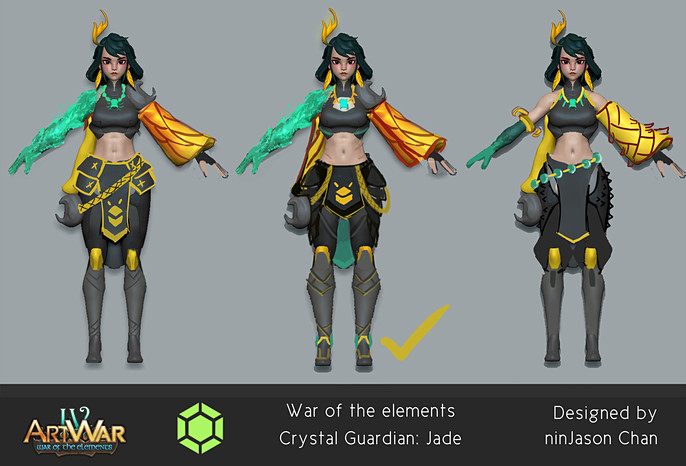
Colors
I tried to keep my color palettes simple. Green, brown and gold were selected as they resemble Earth mineral colors. By following the big, medium and small principle I made the entire frame more readable using colors. Brown for the bigger shapes such as the background, and then green and gold for smaller details. By controlling the value and contrast of the image, I was able to highlight the silhouette of the character from the busy background.
Hair
I was more worried about what hair type to give my character rather than creating the hair. Choosing the right hair type for your character is important, as it defines the art style of your entire piece.
There are 3 types of 3D hair that I know so far. You have the poly hair, hair cards and particle hair, each of them has their own strengths and weaknesses. However, when it comes to render time, poly hair trumps all, and it also suited my character the most. It is stylized and the shapes make a clear silhouette. The eyebrows were made from following Nazar’s tutorial on YouTube.

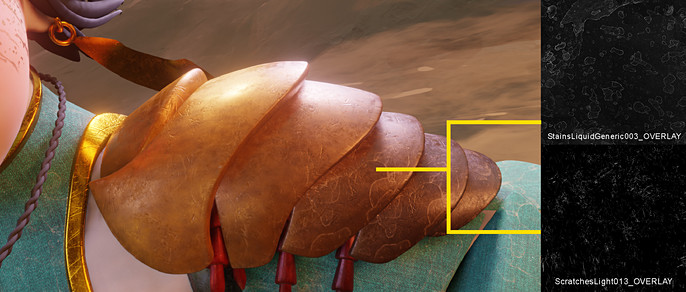
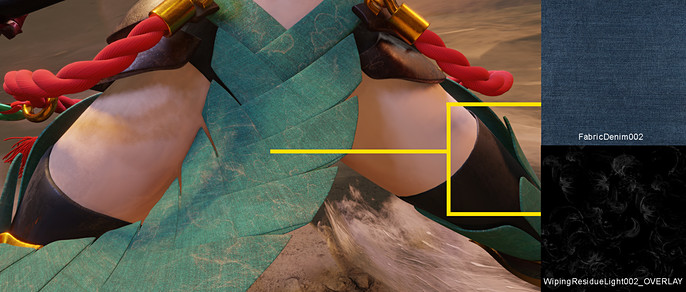
Texturing
Textures were either done inside Substance Painter or baked inside Blender. The entire clothing is coated with a dust overlay to display the result from the sandstorm. The ground texture can be found inside Quixel’s Megascan library. Since this character is more towards the stylized side, I minimized the size of the textures, leaving the eyes to rest more on the bigger shapes.
Environment
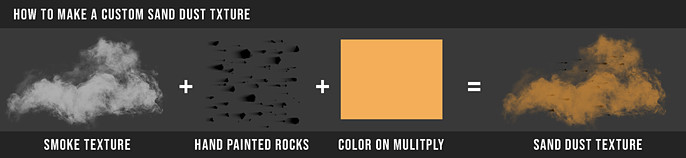
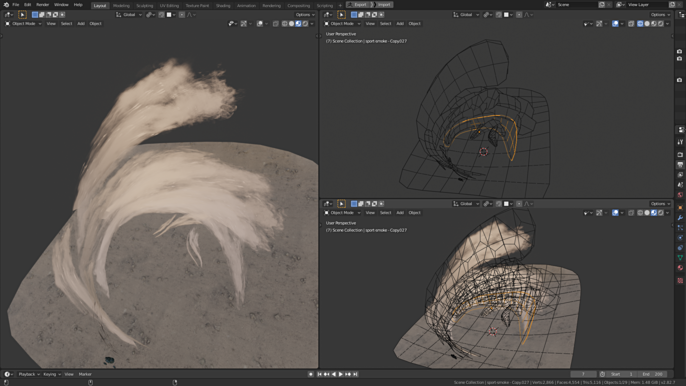
The environment is here to tell the character’s story and to show off her power. The sand is just a textured image plane. It is duplicated and positioned into the shape of a sandstorm. I customized my sand texture in photoshop, by coloring a smoke texture brown and adding a few small dots on it to resemble rocks.
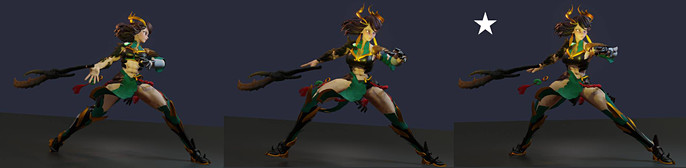
Pose
Finding the right poses for your character is often a nightmare because she is a human character, people will generally pick up the anatomy errors right away. To showcase everything that I have made, I try to choose a pose that will show the character’s entire body as much as possible in a frame.
In order to get a better understanding of how the joints bend, I took photos of myself as reference. I think it is better than observing poses found online because you won’t get a lot of information from a few available photographs.
Lighting
A simple 3 point lighting set up was used, along with a few extra lamps to highlight certain parts of the body. I used a dark blue toned HDRI environment map to enhance the reflections on the materials, and a soft, warm bounce light, at the bottom pointing upwards, to emphasize the light reflection caused by the sand around her. My initial idea was to have the sand emit light, but that kind of made it look like flames, so I lowered the brightness.

Video Presentation
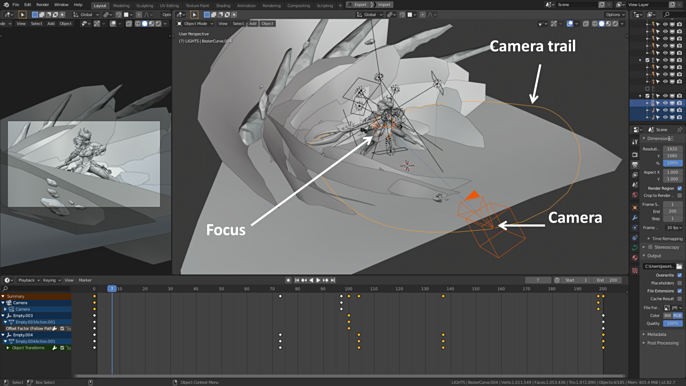
Finally, I made an orbit video of Jade using Eevee, just to show off the entire model in every possible angle. While the final still images were rendered using Cycles, for a physically-based results. BlenderBinge’s tutorial on YouTube was super helpful when it came to learning how to make a camera orbit around your object.
https://www.youtube.com/watch?v=K02hlKyoWNI
Big thanks to the Cubebrush staff and everyone else involved in making this contest possible. It’s a great way for artists to showcase their work and learn from each other, and It’s an honor to see myself.


Follow Jason here.